Showing posts with label gadgets. Show all posts

Saturday, January 23, 2016

RG's workshop: Record crate

I have an old wooden crate that is the perfect size for holding records, but unfortunately with garage sales and whatnot, one crate is no longer enough to hold my record, ahem, "collection".

It occurred to me last year that I could make my crate own out of the LADE boards that come from bed slats, and which are so useful for many projects, including the 90-minute glove rack and the long things holder I briefly mentioned in my last post. I took photos during the process and I'm finally getting around to posting about it.

It starts with isolating the wooden slats from the cloth straps that are stapled into them to keep them together while in use as a bed. First I separate the cloth from the slat by grabbing it with needle-nose pliers and rotating them.


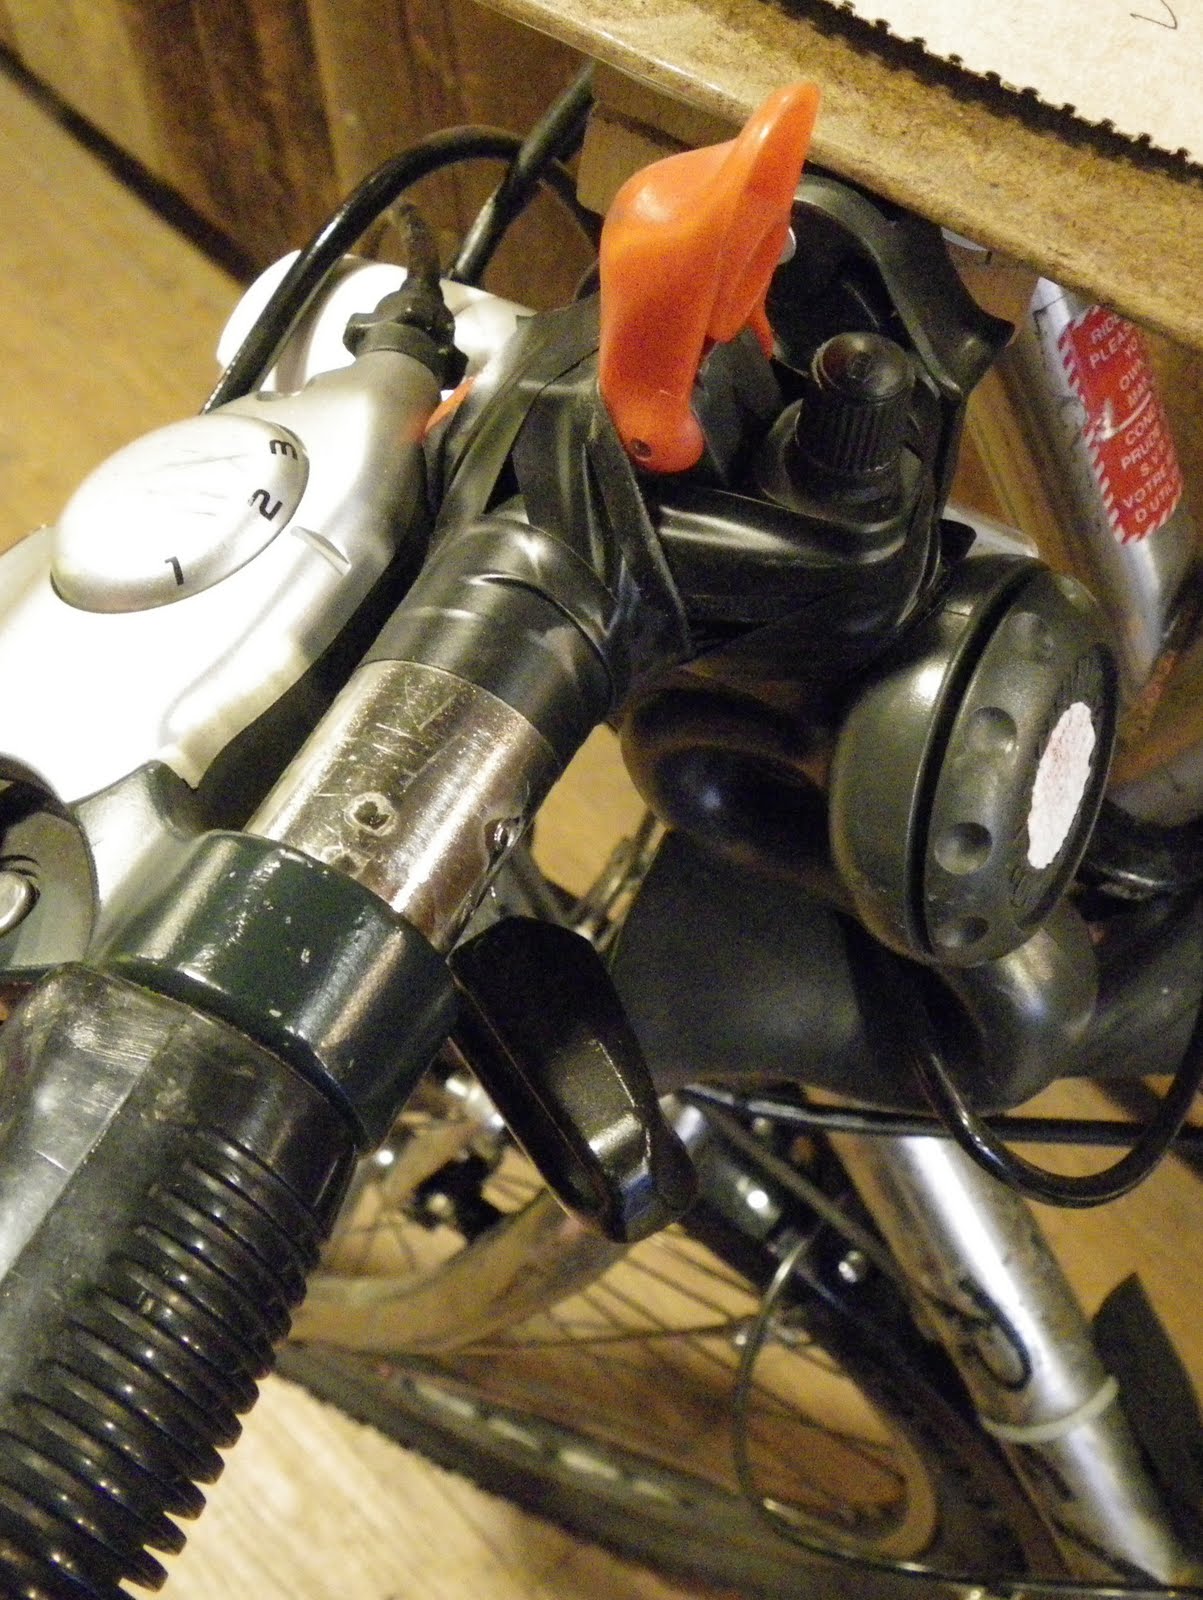
Sometimes the staple comes out with the cloth, otherwise it just sort of bulges. This usually gives enough room to clamp some locking pliers onto the staple and rotate the pliers to remove the staple nice and cleanly:


Here's the schematic I drew for myself after figuring out how to get the various pieces I needed from 26" long Lade boards in order to get a crate that is roughly the same dimensions as my antique one, i.e. 17.5" by 9" and tall enough to hold 12" records.


I marked the boards for the 9" slats that go on the ends of the crate. The longer component is for the side and bottom slats, and they're screwed on the outside so they can vary slightly, but the 9" ones are screwed on their ends so need to be a consistent length. (You can also see the first draft of my figuring out)


Here I'm cutting the pieces with a mini handheld circular saw I bought. This is the only power tool I've bought (I inherited my drill and not counting the Dremel or heat gun) and though I'm more comfortable using hand tools since that's what I used growing up, being able to cut a board in two seconds with very little effort is very useful.


Cutting the boards lengthwise is even harder with a hand saw (and I've done it before for the side pieces on my laptop box). Since the circular saw has a plate that would bump into any clamps I tried to use on the lengthwise cut, I screwed the board onto a longer, sacrificial board from underneath and clamped that one down.

The lengthwise-cut pieces form the corner bits that hold everything together. Here I've tied (using the straps pulled off of the Lade boards) the end pieces to the corner bits to mock them up and see how well things will fit together.


Another reason I needed to mock it up was to see how I wanted to arrange the slats. In my diagram I had a hole cut out of the end boards, but I realized that I could just omit the second-highest board and the top board naturally becomes a handle.

Here I'm lining up the screws in the corner bit to match up with the end pieces (I'm too impatient to bother with glue and still wasn't sure how or if everything might come together). The screw heads will be covered over later by the long side slats. I had already screwed the other end together, and because it's used wood that is slightly warped, I needed to clamp two boards onto this end to make them straight for inserting. In retrospect, the screws for the lowest end slat should have been higher up in order to allow more room for the ones that will be screwed in from the bottom for the bottom slats.


Edit: After posting this blog entry, I discovered a photo of a second crate I had started to build which I had forgotten. I pre-drilled this set of holes in the pieces before making the linear cut to assemble the corner bits. Unfortunately, I didn't think to have the holes for the bottom piece a bit higher. You can see how the pieces are screwed to a longer board that I can clamp down during the long cut (I had removed the top piece for this photo to show how they were both attached). After going back to verify that I hadn't finished a second one, I found the piece still there, waiting to be sliced in half. I might actually dismantle it again and pre-drill the diagonal holes for the long side pieces too before cutting it.


Here are the first two bottom slats being affixed to the assembled ends. The alignment was a bit off, but nothing a little forcing can't fix. I offset the screws that attach to the corner bits so as not to conflict with the screws I'd just inserted, before I realized that I'd also need to drill holes through where these screws go for the side slats! I don't remember exactly how I addressed this (and I'm not going to empty it out now and turn it upside down), but it's not the end of the world.


Here's the side view, after attaching all the bottom boards. The slat at the bottom of the picture is the top slat and I installed it first to make the ends square. It's screwed from the inside to keep the outside clean. You can see how I've pre-drilled the holes for the remaining side slats on the opposite side. These screws on the inside are exposed (albeit only if you're looking in the box) so I used brass coloured screws.

The next time I assemble one of these crates, I would not only drill the holes in the corner bits before assembling the crate, but I would drill the holes for the long side slats at an angle so it's easier to screw them on.


Due to a miscalculation, I hadn't cut quite enough slats for the long sides, and by the time I finished I didn't want to bother cutting any more. Three is enough to hold the crate together and the contents in. One pair of screws is visible on the corner bits, but I don't particularly care. I also ended up with two extra 9" pieces, which were useful to have around for a future project.


I had intended, but forgot, to have the uppermost long side slats be raised by the width of a board, so that when these crates are stacked the bottom slats of the upper one are nestled into the side slats of the one below. I can do that for the next one to go under this one. It doesn't really make a difference for stacking my antique crate on top of this one.


Lade boards come in different widths and lengths, so if you're not trying to match the dimensions of a preexisting crate, you can play around with the sizes. You can see here that there's lots of room in all three dimensions to play around. Since the end pieces and the long bottom/side pieces are cut from the same board, you can make the box a bit narrower in one dimension to be wider in the other.


This is important for ensuring that the narrow dimension is a multiple of the width of the slats, so there are no gaps in the bottom. I hadn't factored that into my measurements and ended up having to put a thin board in the bottom because I had some gaps, which are a hazard when you're using the crate to carry narrow objects like record sleeves!


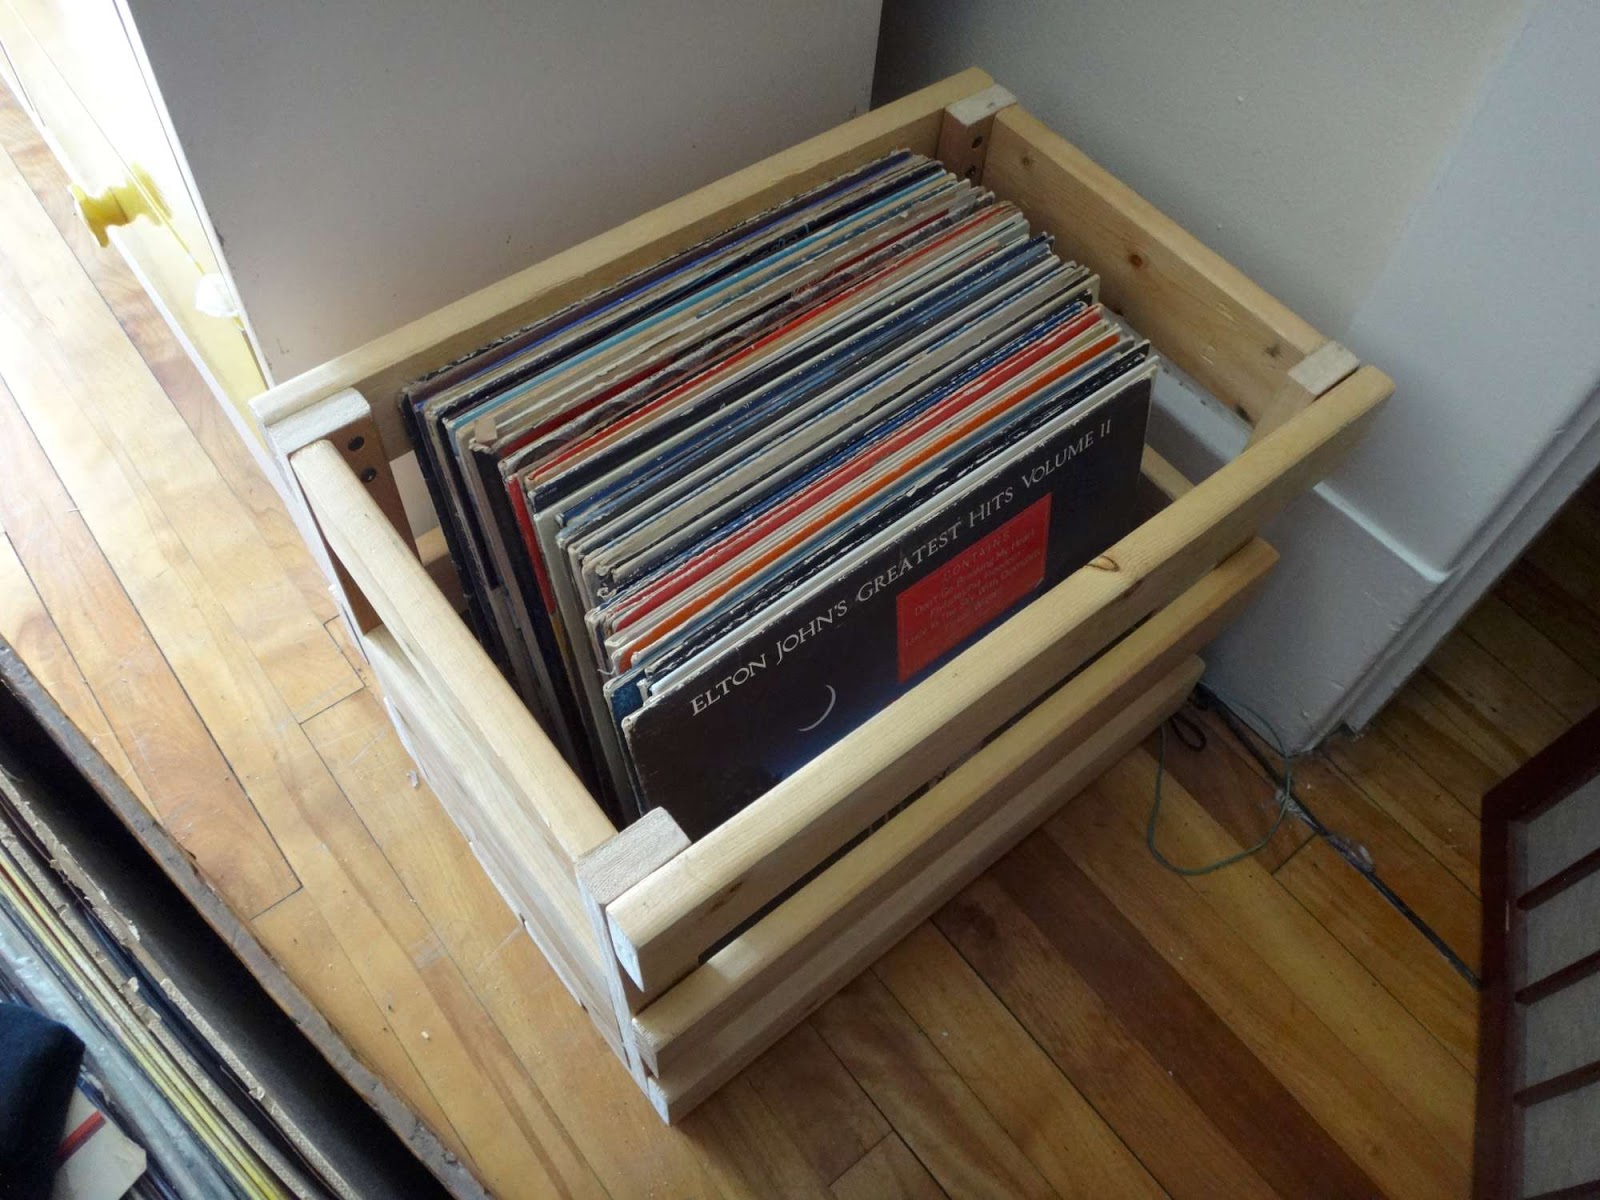
Nevertheless, I'm really happy with how this turned out. I could paint it, but this suits me fine since the boards have already been treated by our fine friends at IKEA (a store which I hope never to have the misfortune to visit in person as long as I can still find their products secondhand at the curb).

- RG>

Monday, January 18, 2016

RG's Workshop: The Vicetray (eventually... maybe...)

[Before I begin, I should note that as a Canadian, Wikipedia informs me that Canadians use the US spelling of "vise" instead of the UK spelling "vice", which was my first instinct. I've used "vise" throughout, except in the header where it makes a good pun on "icetray".]

Due to the limited amount of space in my kitchen, I stack my large dinner bowls on top of my dinner plates in the cupboard in order to conserve it. My bowls are heavy ceramic ones (nice ones, sturdy... I found them on the curbside ages ago along with some matching breakfast plates), so it requires a bit of effort when I want to grab a dinner plate out of the cupboard. If all five of the bowls are clean and put away, I have to actually take them out and put them down on an available surface (itself a challenge) and then get a plate, because the bowls are too heavy to lift with one hand (there are some other logistical difficulties involving contortions and stretching that also drive this requirement).

Lately, I've been toying with the idea of suspending the bowls above the plates somehow, allowing free access to the plates beneath. Unfortunately, the easy solution is off the table (or out of the cupboard). I can't simply put a table-like tray over the plates to hold the bolws, because there's not quite enough vertical clearance for that. Instead, I'll need to suspend the bowls slightly with some sort of cradle mechanism holding them from the sides, either from above or from below. This would allow just enough space for me to slide the plates underneath. How exactly this will work will take some thought.

Off I went to my workshop with the pile of plates and bowls to do some figuring and measuring.

On the way to the workshop (this is a trip taken on foot, I should mention, through two rooms. I don't have like a basement or giant shed full of power tools. My workshop is barely larger than a closet, and much less tidy), I stopped at the bedroom and put the plates and bowls down because I figured I should make sure there's a destination surface for them in the workshop.

Once in the workshop, I saw that my workbench was covered in sawdust from the last project, and various screws, bolts, and other knick-knacks that got relegated there from other parts of the house. Before brushing the sawdust off the workbench, I filed away the screws and bolts into the appropriate containers, tucked the bolt cutters back into their home, and started putting the hand tools back onto the pegboard.

My wire brush, however, didn't appear to have a home on the pegboard. In keeping with the mindset of the day, I figured I should make one. Usually I use coat hanger wire but I didn't have any scraps of that handy. What I did have, though, was a broken election sign metal stake, whose wire was the perfect thickness for pegboard holes, almost a quarter inch in diameter. I retrieved my bolt cutters from where I had just put them away, and cut off a chunk of wire.

If you've ever bent your own pegboard hook, you'll know that the end that goes into the pegboard has two nearly 90 degree bends very close together, maybe a quarter inch apart. If you've worked much with wire, you'll know that a quarter inch is ridiculously hard to bend accurately at such small distances with hand tools. I knew this, but tried anyway.

I was able to bend the end the tool hooks onto, but the pegboard end was stumping me. I have a wire-bending tool from Lee Valley, but the part of the wire I needed to grab on to was still to short.

I thought maybe it would work if I hammered a flathead screwdriver onto the wire with two things on either side of it, but that just resulted in other stuff jumping off my workbench from the hammering. I'd need a stronger tool. Hey, I've got a vise! I'll use that.

I got my vise out of its hiding spot, pushed aside anything I hadn't yet tidied off the workbench and swept away the sawdust to have a clean surface on which to put the vise.

My first choice of things to clamp the wire into was the cavity on my Lineman's pliers, the one opposite the space where the wire cutters are. But that just pushed the wrench open. Also it was too big.

I realized that my combination wrenches have a circular opening at one end and I had a variety of sizes to choose from. Using one of the pegs from the wire-bending set, I stuck the wire, the wrench, and the peg into the vise, and clamped. I was worried that the crimping on the wire would cause it to snap, but it bent perfectly!


While I was at it, I made a second pegboard hook too, since I had the right equipment out. I rearranged a few of the things on my pegboard, and somehow ended up using both of the newly-made hooks for other things. So I put the wire brush on a hook that was probably available before I started with all the wire-bending.

Never mind, that was done, I could continue with tidying the workbench to start working on the bowl thing. Oh, but the vise!

I keep the vise on the floor, under a shelving unit in a particular gap that isn't useful for much anything else than storing a vise. (In a proper workshop, I'd keep it mounted to the workbench) But vises being heavy, it's a struggle to push it underneath there, particularly without scratching the hardwood floor. I'd been thinking for a while about some sort of trolley mechanism to allow me to slide it in and out from under the gap so I would only have to lift it vertically.

My brain went crunching, and I sketched out a diagram of how that might work. A wheeled tray for something that heavy is bound to leave marks on the floor. But a drawer mechanism with a couple of flat boards should work nicely...

I went into my box of miscellaneous bits of furniture to find some rails and trays. The only flat style tray (which you mount sandwiched between the two flat surfaces) was a full-extension drawer mechanism, which I'd rather save for something else. But I did have the rails salvaged from a keyboard tray. Wrapped around the rails was a baggie with the four recessed mounting screws that came off whatever piece of curbside furniture I scrounged it from. Good foresight on my part, if I say so myself.

I found two boards of roughly similar size to try to mock it up on as a proof of concept. I didn't want to go to all the trouble of building the thing (and putting holes in the boards) if it wasn't going to function well.

The thing with keyboard trays, though, is that they aren't well suited to mocking up. They are mounted to the bottom of the moving part, and the stationary parts are mounted to the sides of the enclosed area, so I can't simply put the board on top of the rails and see how well it slides, because the bottom of the board is lower than the rails and rubs on the table. Not only that, but only one of the sides has an enclosed channel; the left side rail can come straight out (presumably to make it easier to install and adjust).

I found some short screws and hastily screwed the rails onto the moving board, without even bothering to drill holes for them. This wasn't enough; the channels also have to be mounted to something so the moving board can be suspended from it. I disassembled a set of blocks I had built for some other purpose that didn't work anymore to get two short boards from it and I screwed the channels onto them.

Still, though, I couldn't mock it up. I tried resting the two sides on the workbench and installing the moving board between them. I had to hold the sides together to keep the thing from falling off, but when I did that I squeezed it and couldn't tell if it was running smoothly.

I managed to find a piece of hardwood (scavenged from a 1970's government-issue wooden desk that my landlord left on the curb) which was the perfect width for the job, and with some metal L brackets and screws (also a curbside find), attached the sides to the hardwood bottom. Bending the L brackets slightly allowed me to 'fine tune' the adjustment of the rails, and it worked great!


Okay, so much for the mockup, but I realized that in trying to mock it up to see if the mechanism worked, I had actually built the thing. Unfortunately, I had not carefully considered the relative arrangement of the top and bottom pieces in so doing. They lined up nicely. Too nicely. My initial design had a support sticking out from the front end of the top piece so that the whole mechanism doesn't just tip over when fully extended with a heavy vise on top of it.

But then I realized that I could just screw on a small block to the front to achieve the same result (with a perfectly-sized block coming from the aforementioned disassembled previous project). Voilà, like so:


You'll note, however, that the top surface of the board is lower than the non-sliding channels, and the vise is wider than the top board. Luckily, the top board was scavenged from a discarded BEKVÄM kitchen cart, which, despite the one broken part on the one I found on the curb and disassembled for parts, has great birch components. More luckily, the BEKVÄM has two identical panels of this size. Without even screwing it on, I just rested the second piece on top and that worked perfectly. The top of the moving board was now higher than the non-moving parts.

Here's the tray resting in the gap under the storage unit:


I had to find a way to keep the whole thing from dragging out under the friction caused by the weight of the vise (and, let's be honest, a lazy alignment of the rails). I looked at the setup for a while, considered various complicated options including lining the base with bike innertube rubber or somehow attaching it to the legs of the storage unit, but then realized all I had to do was stick a hollow metal rod behind the storage unit's legs to hold the base back. I grabbed an appropriately sized rod from my container for long skinny things (which I built a couple years ago out of LADE bed boards, featured previously in the 90-minute glove rack):


All that was left was to put some felt padding on the base of the end that sticks out, so it doesn't scratch the floor. Not wanting to go to the trouble of getting my felt from my crafts bin in the closet (or, more specifically, having to put it away afterward) or figure out what kind of glue I'd need to adhere it to the wood (although in retrospect I think I have some self-adhesive furniture-bottom felt padding in my workbench drawer...), I instead used a scrap of old t-shirt cloth that I'd been using as a rag.

Even more lazily, when the twist tie I moved off the workbench in the initial round of tidying that I thought would be long enough turned out not to be, I just used some metal wire to hold the cloth on. Since the vise tray is going in the workshop, you know, it doesn't have to look pretty! (And immediately after putting the other tools away I found a different twist tie I had also moved aside in the initial round of tidying, which was, as I had suspected, long enough!)

Anyhow, here's the cloth padding on end of the upturned tray:


And final testing... just enough clearance. Works great! I thought about putting some sort of handle on the device to give me something to grab a hold of. I considered the four remaining loops from the bracket used in my bicycle handlebar clipboard mount, but couldn't think of a quick and easy way to attach it that didn't involve drilling (since it was now just past 10pm).

As it happens, the problem solved itself because I discovered that the vise happens to make for its own handle. Not bad, eh, for a contraption built without having to saw any wood and using only previously-scavenged items that I had lying around in my workshop?


Finally, with the vise tray built, I could start working on the plate thing! What was that again?

I put the stack of plates and bowls on the workbench, stared at it for a while, held some boards up next to it in various orientations, took a couple of measurements, made a rough sketch, and then put the dishes back in the kitchen cupboard.

I no longer have the energy to do that tonight. Maybe some other time when I'm trying to do some other project I can let myself get sidetracked into building the bowl cradle instead.

- RG>

Thursday, March 27, 2014

Internet radio goes to shit

I received a notification from Last.fm that they were killing their streaming radio service as of the end of April (for which I was paying a whopping $3/month). The notification was actually very useful, with clear links to useful pages such as how to cancel the auto-renewal on my subscription, etc.

They have a beta version of their new player, which I tried... briefly. It appears to embed Youtube videos of copyrighted songs into a player, ads and all. One of these ads was over 2 minutes long, which doesn't work for me because I like to go into another room and let the songs play, with my cursor over the "skip song" button if I don't feel like listening to one. Yes, you can click to skip the ad after five seconds, but then I'd have to fiddle with the cursor and that's not worth a paid service.

Also, the sound quality sucks. I'm not talking a snooty "mp3s have compressed audio and you don't get the same experience" type thing. This sounded like they were running the audio through a telephone line and recording it on a wax cylinder.

So time to find a new online radio service.

I looked around at a few. There are a couple that don't work in Canada.

I'd heard the name Grooveshark thrown around and I'd thought I'd check it out. Naturally, to do this, I typed "Grooveshark.com" into my browser and got to their homepage.

The homepage appears to be the service itself. No introductory text or even a brief description of what type of service it is. Just a bunch of buttons and click-draggy things and tools for using it. After a few seconds of staring at the incomprehensible interface looking for a link for "About", "What is Grooveshark?", or "Start here" (of which there isn't), my screen was greyed out and replaced with a "you have flash disabled" warning that I couldn't dismiss without closing the page.

Eventually, I made my way to the help page, of which there were no useful options either to describing what the service is. The closest I could find was "how to use the service after setting up your account." Why the hell should I set up an account if I don't even know whether this service even remotely resembles what I want??

I know what you're thinking: JFGI. Go to the Wikipedia entry for Grooveshark.

But do I really want to use a service that can't even describe itself (or at lest can't be bothered to)?

As a courtesy, I thought I'd let them know that their website does a shit-poor job of turning interested visitors into users and customers, through a support form on their help section (I think I filed it under "bug report"):
 
Looking for replacements for last.fm and someone sent me to Grooveshark. Trying to figure out what it is or how it works but there's no "about" or description anywhere, not even on the help page. wth? (Not to mention that I couldn't even look around at it because I couldn't dismiss the "flash player blocked" popup).

Could Grooveshark serve as a replacement for my needs? Maybe, but I'll never know!

Perhaps not the clearest, but I think I got the point across.

To their credit, they responded relatively quickly, but that's about the only credit they'll get. The response itself was so spectacularly obtuse I feel compelled to share it with you:
Hello. Thank you so much for your patience and please accept my sincere apologies for the inconvenience. Will you please complete the steps below in Internet Explorer OR test Grooveshark from a different web browser (preferably Google Chrome https://www.google.com/intl/en/chrome/browser/)?

**Please note the steps below will reset IE to default settings. Your bookmarks, extensions, plugins will be removed.**

1. Open Internet Explorer
2. Go to http://support.microsoft.com/kb/923737
3. Follow the instructions on the page

Here's the Getting Started Help article for Grooveshark as well.

http://help.grooveshark.com/customer/portal/topics/287-getting-started/articles

Please let me know how it goes. I would like to help.
So to sum up:
  • I asked them for a general description of their service (or more specifically, I pointed out that they do not make such a description easy to find)
  • They sent me instructions to wipe my Internet Explorer (which obviously wasn't the browser I was attempting to use because it doesn't even have the ability to block Flash!)

I don't know why I even try sometimes.

Oh, and if I've given Grooveshark a pass, where am I now? I'm looking at Deezer. Haven't looked hard yet (I still have a month of last.fm left), but it's got a clear yet unobtrusive "What is Deezer" link on the sticky bar, and the description one finds there is clear and clean.

Friday, January 03, 2014

Have your Google Analytics stats fell since Blogger started the country code TLD redirect?

[Edit: This did not work. Now my analytics are showing even fewer results. Apparently you're supposed to enter the code in Blogger under Settings > Other > Analytics Web Property ID. We'll see if that recaptures both the .com and .ca traffic...]

A couple years ago, Blogger started redirecting all of their users' blogs from blogname.blogspot.com to blogname.blogspot.xx, where xx is the country code top-level domain (TLD) for the country that the user blogs from.

I noticed this at the time and was skeptical that this wouldn't have unintended consequences, but I didn't particularly care because at the end of the day I'd rather have a .ca blog address anyway (though I could certainly see issues for people who blog while abroad or blogs published by various international collaborators). Other people did care and they found ways around the redirect.

But tonight while checking my blog stats, I noticed something strange. My stats had been down for the last couple years, and this is normal given how godawfully rarely I post, and how minimally relevant my posts tend to be. I also figured that when Google Analytics fucked up their interface and got rid of the old dashboard that gave me the most useful information all in one place, they also fucked around with whether pageviews or visits or visitors was the key statistic, and how this was counted.

It turns out that my skepticism was indeed accurate: it was only counting hits on realgrouchy.blogspot.com, and missing most of the visitors who are coming to realgrouchy.blogspot.ca!

Observe:

In Blogger's built-in stats, it says I had 846 pageviews in December 2013:


Meanwhile in Google Analytics, only 146 pageviews were reported for that month, less than 20% of the traffic that Blogger was getting! And it should know, since it was serving up the pages!


The fix is not difficult, but it's also not the most obvious. It also isn't retroactive. In Google Analytics, click on the Admin button at the top right, select the relevant 'property' (i.e. your blog), and select "tracking info". Then turn on "Multiple top-level domains of [blogname]." The multiple subdomain option will also turn on automatically if it isn't already. The code in the text area below will change:


Then go into your Blogger admin page, click on the Template settings, open the HTML view and replace the old Google Analytics code with your new code. One of the articles I skimmed over while looking for solutions suggested you should put it in the <head> tag because the script might not get run if it's at the end of the page body and there are other scripts that mess with visitors' browsers.


I couldn't find any articles that specifically identified the Blogger problem and connected it to this solution, which is why I'm blogging this now, even if it is a couple years late. However, I won't necessarily be able to tell if doing so increases my blog traffic because I should be expecting an increase anyway after this fix. I guess I'll just do it for the good of humanity.

- RG>

Sunday, May 12, 2013

Picasa wasn't meant for people.

I got a new computer a couple weeks ago, taking the plunge from Windows XP to Windows 8 (which is another story in itself). One of the big things that worried me was my Picasa albums.

The last time I tried transferring to a Windows 7 (sic) computer, Picasa's albums would only restore on the new computer if the filename (including folder structure) was exactly the same, and Windows 7/8 doesn't let you name folders the same way as in XP. In other words, when it opened the album listing, it looked for the photo in the given directory, and promptly removed the photo from the album when it couldn't find it in the non-existent folder.

Luckily, since that time, Picasa for Windows has changed the way it handles albums so that it stores album data in the photo, or in a hidden file in the photo's folder (sic). This meant that my albums were restored. Not only that, but they managed to somehow list many of my photos twice. Which is better than not at all.

But the People albums photos are a different matter. I guess Picasa is meant for people who primarily take photos of other people, whereas mine, for the most part, aren't. I don't want to connect my photos with my Gmail account contacts or my (non-existent) Google plus account. Nevertheless, a while back (before Google plus even existed) I had spent a considerable amount of time putting nametags on people in many of my photos, diligently looking up the names of people I recognized but whose names I didn't remember, etc. As I added more photos, I'd occasionally add nametags to those photos also. This way, I could at least remember these people's names long after I forget who they are. (I also hate inheriting albums full of unannotated photos of people I don't know.)

After using Picasa for a while on this new computer, somehow the people albums caught my eye, and a lot of "person" albums came up that were called "". Each of these contained a handful of photos of people I do know, who had their own "people" album already. Some contain four or five photos of the person I know and a couple of other headshots of people I don't. There doesn't seem to be any rhyme or reason to why these photos are like this; most of them aren't in albums or folders I've uploaded (and I haven't yet logged in on Picasa with the new computer), so it's not a permissions thing with my Google account...

After a brief search online, it looks like there's no fixing this, except the hard way: re-naming the people, which I started to do. Tangent:

(It is very difficult to bulk-rename people who are tagged in a Picasa album. You can select them and right-click and select "Move to People Album..." and then a list pops out of the context menu of people, but you can't search this list and the scrolling arrow is horrendously slow. Another way is to go into each photo, find the person in the photo, click on their head and type in their name. The least difficult way is to scroll the left bar to the people album for the desired person and drag the selected photos onto it. But there is no way to simply right click, or click somewhere, and type the name of the person you want to reassign these headshots to.)

Once you're done reassigning these people, you have to individually delete the empty people albums for "". In my case, a few dozen of these. You can't bulk-select them, and it doesn't prompt you to delete them when they are empty. Meanwhile, they clutter up the People album listing (at least they're at the bottom).

Then there's the whole part about "long after I forget who they are". The official Picasa solution of "you'll have to re-tag all these people" breaks down. I tag the people to remind me who they are. If I'm going to re-tag them, I need the nametag to tell me who they are. For example, there is a Citizen photographer in one of my photos whom I had apparently tagged. This is handy, because I can never remember which of them is which. This is why I tagged him. I presume I cross-referenced the Ottawa Citizen's photos of the event at the time and added his name. I can't re-tag him because I don't remember which of the Citizen's three or four regular photographers he is.

Luckily, I still have my old laptop and I haven't deleted my data off of it yet. (In fact, I still have all but my first computer, each of which in various states of preservation)

But of all the stupid things, holy gee! It's things like this that make me paranoid of changing computers, and when changing computers, of changing operating systems. The Windows XP to Windows 8 transition is manageable enough, but damned if I'm going to try switching over to Google Chrome!

I've still got a Windows XP install disc. Maybe I'll try installing that on the new machine and seeing if it doesn't blow up.

- RG>

Saturday, April 13, 2013

If it weren't for Star Trek, I might not be yelling at my computer.

Because it's usually disguised as the present, it's easy to forget that we live in the future. Every now and then when I encounter a new unexpected piece of technology conveniently replacing a simple task, I'm momentarily reminded of this: Doors that open when you walk near them. Lights that turn on in a room when you walk into it. Locks are controlled by digital keypads. You can enter, use, and leave the washroom without touching anything but the toilet seat and the stream of water and soap. Many of these technologies have been around for a long time on an industrial scale, but they're now readily accessible on a consumer scale too.

And then, every now and then when the technology breaks down, I forget it again. It's easy to not contemplate the future when you're preoccupied with trying to simply open a door or turn on a light. Silly RG, they don't yell at technology in the future!

Other things from science fiction programs of yore are also available: modern PDAs, tablets and laptops far outpace anything Star Trek imagined in their respective form factors, and the combinations of things you can do with them have tremendous potential. Skype and FaceTime let you have live video conversations on demand with ease, and you don't have to have a console monkey in the room to put it up on the screen for you (I presume; I don't like user-facing webcams myself).

Even the famed communicator, which lets Captain Picard reach anyone he likes by tapping a button on his chest, is here: Apple iPhone 5 users have their very powerful and quasi-sentient "Siri". I don't use an iPhone, but I've had this function on my Blackberry for as long as I've owned one: I simply press and hold the button on my headset and tell it a phone number or the name of one of my contacts. My old Nokia brick phone prior to that even let me record up to 20 sound bites to associate with voice-dialing contacts.

I even rented a car recently which didn't have a key. There was just a fob I had to carry around, and the car knew I was near it and unlocked the doors for me. It knew I was inside the car to enable the "start" button that I pressed to start the ignition. These features were so unexpected they had to be explained to me by the clerk, and it took me even longer to figure out how to turn the lights on once it got dark, long after I'd left the lot. (It'll be interesting to see scrap heaps ten years from now filled with cars where 99% of the electronics and machinery still work but an out-of-production patent-protected fingernail-size part prevents the computer from letting you turn on the steering wheel.)

But science fiction's impact on our relationship with technology does more than just drive new ideas and foster automated convenience. I think it also drives our frustrations with technology, too.

Think about it. When you think about technology on the Enterprise, you think about how it works, right? What about when it doesn't work?

There are plenty of examples of futuristic technology not working on TV, sure. But when it does break, you usually know why (even if the character might not). If the cause is not something obvious like a catastrophic power loss, it's usually something nefarious. Someone has locked a control panel, or a villain has short-circuited the turbolift, or Moriarty has reprogrammed the holodeck. Sometimes there's some energy-based lifeforce that's screwing with all the systems in the ship that only creates the subtlest of symptoms. And even then, the characters usually have a workaround readily available, because unlike your journey through the doorway, the TV plot must go on.

How often have you watched science fiction and something went wrong for unknown, unexplained, and relatively benign reasons? In other words, because it simply isn't working properly? Not often, I'd say. There's no such thing as an idiopathic TV tech malfunction; everything happens for a reason—usually a malicious reason—and if you don't know already what that reason is when the character encounters the problem, you'll probably find out by the end of the episode.

So then think about your own experiences with technology. I, for one, couldn't tell you how many times in a week I go to do something with a computer, or my phone, or some other gadget, and it refuses to behave itself. I know how it's supposed to work and I've gotten it to work a hundred times before, but it won't do it this time. I spend hours trying to figure out what the problem is, trying workarounds, reinstalling things, only to eventually give up.

It still has power and is configured the same as when I last used it. It's responding to all my other commands. But it's not doing this one thing that I want it to do now. There must be a reason for the holdup, a malicious force at play, I just haven't figured out what force that is. I know there must be something because that's what I'm trained to believe by years of watching science fiction TV. Well, nobody else has been using my computer, and there are no supernatural forces at play.

Therefore it's the computer itself that must be the malicious actor trying to keep me from doing what I want. Occasionally one can blame the manufacturer or software designer, but neither of them are in the room and it's hard to curse at someone when you don't know their name. It's convenient enough, on the other hand, to blame the computer. All the other variables are controlled, which leaves the computer as the only thing that can change what's happening with my computer.

So after a frustrating few hours, wasted, trying to get my futuristic gadgets to perform my benign chores, I forget that we "live in the future". I forget that breakdowns of technology are only malicious on TV for plot reasons.

And I forget that people in the future don't yell at their computers.

- RG>

Monday, December 31, 2012

RG's Workshop: Mega fridge magnet (or: keeping up with the Scrimshaws)

At last, some spare time in which to catch up on some overdue blog posts about stuff I've built...

So a couple years back, David Scrimshaw shared an idea of his to use the large magnets from old speaker cabinets as fridge magnets for holding drill bits.

Not long after this, I used a similar principle to make a fridge decoration, only I used the sleeve from a discarded baby shirt and tied the ends to make it look a bit like a giant cloth peppermint wrapper. I failed to take a photo of this, and I must have given it away because I can no longer find it on my fridge.

But the curbside has since yielded more speakers, including a very large pair of cabinets earlier this year. I dismantled the cabinets and extracted just the speakers to bring them home (I also kept the screws that held them in, which were also of very good quality).

To power a big speaker, you need a big magnet. Here it is on my fridge, with a Kryptonite U-lock for scale:


It also holds tools, such as a hammer, chisel, wrench, screwdriver, and pliers:


I needed the U-lock back on my bike, but decorated it otherwise with tools and binder clips.


Tools, and a magnetic clip on the woodsaw which is holding a fortune cookie slip that reads, naturally, "others are drawn to your magnetic personality."

- RG>

Friday, September 07, 2012

RG's workshop: Stereo system switchboard

It's been a while since I wrote anything on here, and even longer since I blogged about anything interesting. (Oh crap, I hate it when people start off their blog posts talking about how long it's been since they last blogged. You know what? Strike that first sentence. Let's try at this again.)

I have a relatively small apartment, though it is big enough for me and my stuff. It has enough rooms, including one I use as my workshop.

In the living room of my apartment, I have a stereo system. That is to say, there's a stereo device I found on the curb somewhere, through which I route the audio that accompanies the projector screen (among other uses).

The stereo has two sources of external input, not including the radio/CD/cassette stuff built into it. These inputs consist of one end of an audio cable being plugged into the stereo unit's "AUX INPUT" jack, and the other end of the cable split, one path plugged into the turntable in the bedroom, the other connected to a long cable with a standard mini jack. I can plug the mini jack into my laptop or my Blackberry, and the cable is long enough--and my apartment small enough--that I can bring either device into any room of the house to 'remotely' control the audio.

So for example, I can watch online TV in the kitchen with my laptop on the kitchen table and the audio going through the soundsystem back out to the speakers in the kitchen. I can also use my new Blackberry's FM tuner to listen to the radio (I only started listening to the radio again when I got the new Blackberry last week, and I've thus far tended to listen to the station that has all the ads for hearing aids and funeral service providers). The Blackberry (as with the iPod I briefly owned) needs you to plug in the headphones to listen to the radio, because they act like the antenna, but the stereo jack works just as well.


Anyhow, the stereo sits under this desk which I did not find on the curb. I built it with my own two hands, and a screwdriver and hammer, according to the assembly instructions from the non-Swedish office supply store where I had bought it.

The stereo sits under the desk as does one pair of speakers.

Another pair of speakers goes into the kitchen (which can extend into the bathroom if and when I see fit to have them do so), and as of very recently, a third pair is wired through the wall into the bedroom (which I can extend into the workshop, should I see fit to do that also).

The thing is, I do not want all of the speakers to always be on. I only need the sound in the room(s) which I am occupying. So I need a switch system.

I bought a basic audio switchbox from Radio Shack ("the Source" in modern parlance), which didn't really work. Even after I fixed some bad soldering inside it, there were issues with bleeding between the left and right channels. I also couldn't separately activate the left and right units of a pair of speakers.

So I stuck with my previous scheme of a pair of Y adapters on the stereo output cables and plugged or unplugged the Y ends into the ends of the cables for the desired speakers, all of which I have patched into RCA jacks. I had had the jacks stuffed into the grooves of the CD holder under the desk top (circled in the above photo).


But this did not satisfy me. Functionally, it was not an elegant solution to have cables sticking through a grille. So I decided to build a switchboard (you digital-age kids might not know what a manual switchboard is, but they work very nicely).

The first step was to build a panel that would fit into the space where the grille is. The grille is wedged between two columns that have holes corresponding to bumps on the edge of the plastic grille.

I first bent some paperclips into latches that I inserted into the edge of the thin plywood board at the same intervals as the bumps on the grille. There is a recess underneath them, which allows them to dip out of the way and spring back up to latch the board into place (like on a door). They are tapered so that when you push the board up, they are pushed by the edge of the hole in the cylinder into the recess in the board, releasing the board.

I'd seen this trick done online somewhere months or years ago, but don't remember where. It was probably from a project documented by Rob Cockerham or Matthias Wandel.

Anyhow, it works, and I can put the board into the space, and remove it when I need to by pushing up to release the latches.

The next step was to cut holes for the RCA jacks on the ends of the speaker wires. I needed to get the jack through the board, but I also wanted it to be snug so I could push the Y connector into it without the plug just falling through the board.

To accomplish this, I settled on a keyhole-type shape, with two round holes connected by a channel. One hole was larger than the RCA jack, allowing me to stick it through, and the other was slightly smaller, allowing it to be held snug. The holes were connected by a channel that is wide enough for the cable to pass through. (on the right below is my first attempt, which used a hole that was too small)

After cutting the holes for the four stets of speakers (kitchen, living room, bedroom, and a spare set of holes for future expansion), I painted it black to match the piece of the desk it was replacing. The only black paint I had were a couple of cans of spray paint I found one bountiful day of treasure hunting (a.k.a. curb shopping, dumpster diving, etc.):

My only previous experience using spray paint was indoors, and resulted in everything in the room, including plenty of electronics, being covered with a yellow dust. Thankfully, this room was in somebody else's house, and the electronics were theirs, as was the bright idea of spray painting indoors.

To alleviate this problem, I taped together some newspaper pages into a cube, put the board inside, reached in with the can of spray paint and sprayed it as best as I could with the cube closed. I let the dust settle a bit and reapplied the parts that I missed (the cube filled with spray dust, completely obscuring the workpiece so you couldn't see if you had gotten it all).

The paint job worked well enough for me, for something that would most of the time be in the shadows under the desk top anyway.

The only remaining issue was that the jacks sometimes pulled out of the board when disconnecting the switch cables. This was fixed with that quintessential desktop accessory, the trusty binder clip.

Normally at this point in the blog post I'd go back and review it to make sure it makes sense and doesn't drone on too long, but I'm too tired and I might forget to come back to it if I leave it to another day.

I've built (and photographed the construction of) other things since I last blogged, and I'll maybe hopefully eventually probably get around to blogging those also.

- RG>

Wednesday, December 28, 2011

Bike tip: Safely stowing the air horn

You know how annoying it is to work on your bike and accidentally set off the air horn? Bike mechanics like it even less because it's not even their bike. Many mechanics ask you to disarm your air horn before bringing it in. This has the unfortunate consequence of needing to remember to reinflate the reservoir before leaving the shop.

So do this:

A simple Shraeder valve cap will stick on top of your AirZounds air horn. It doesn't actually screw on, but when you push the button back down, it can't activate the horn, and the cap doesn't fall out.

Your greasemonkey can safely operate on your bike while you can ride home knowing you can scare the shit out of any pedestrian who walks into the street without looking first.

- RG>

Saturday, July 02, 2011

RG's Workshop: RG's Laptop Box

Last year, I bought a new laptop after the audio jack was irreparably damaged on my previous one from being bumped around in my bike panniers too much. (The one before that got a broken screen from the same thing)

Since I didn't want yet another laptop to start breaking up on me, I'd known before I even bought my current laptop that I wanted to build a box for it. So within days of receiving my laptop, I built myself a box, custom-sized for my brand new laptop:

I'd spent the previous few weeks keeping an eye out in trash piles for just the right type of particle board to use. I didn't want it to be too thick, but I wanted it to be strong enough to sit on. You see, the benches at Bridgehead are a couple too inches to comfortably use for typing or writing, and I'd wanted to build myself a laptop box to serve this alternate purpose. Knowing I'd be buying a new laptop soon, with different dimensions, I had to wait until I'd bought (and received) the new one. The old laptop was already busted, so why bother trying to protect it with a box?

I didn't take any photos of the initial construction, but it was almost entirely used materials, including these antique hinges from a cabinet door somebody was throwing out. The side pieces were cut from IKEA Lade bed boards (featured in the 90-minute glove rack) sliced down the middle. While attractive, functional, and perfectly sized, the hinges were a bit loose, especially since they were going in the end of the particle board. I glued the screws in to keep them tight:

The finish on the board I'd chosen had some water damage in some places and was peeling, but there was enough undamaged wood to use for the box.

This was a feature, not a bug, as I was able to use it to veneer the ends of the side boards.

The box was quite oversized for my panniers, threatening to rip them open, but inspiring further creativity in its repair (my 15" screen was a size or two too big with the box wrapped around it).

To economize on space, I cut a notch out of one of the side boards for the laptop's protruding battery case to slim down the box's profile. I also, unfortunately, had to angle the top ends of the side boards, cutting off the DIY veneer in the process. You'll also notice a little metal plug next to this notch (the kind used for adjustable shelving units), which keeps the top aligned and thus solves the loose hing e problem.

In addition to a laptop protective box and a booster seat, the box serves many other purposes. It provides a hard flat surface to rest your drink when lounging on a couch, a writing surface, and, shown here, a laptop lifter to bring the screen to a more comfortable viewing height when, say, watching videos of the masturbating Santa Claus:

A few months later, I calculated that a well-placed 1/2" hole...

...lets me plug in the laptop to charge it while still in its box.

It's the laptop box!

Want your own? Want the plans? Too bad. Figure it out and make your own fucking box!

- RG>

Friday, April 29, 2011

Technology *is* great (when it works)

I'll part from my usual rants about what essential gadget of mine is broken to write about what happens when gadgets do work.

Every now and then, I get a little reminder that I do live in the future, and sometimes I take it for granted.

Like Star Trek for example, just because it's an easy one.

In Star Trek (from TNG onwards, for the sticklers), you had a little communicator that you could tap, say the name of who you wanted to talk to, and then talk to them. We have that now. Many smartphones, when you press and hold the button on your hands-free headset, will automatically recognize your voice and match it to the name of someone in your address book, and call them. My previous non-smart phone even had a similar option, where I could record up to ten or twenty names to associate with people in my contacts.

In Star Trek, there were doors that open automatically for you. Okay, that's old hat. Supermarkets have had those for a long time.

But they also had fancy ways of turning on lights. Like by yelling "lights!" when you walk into a room. I don't even have to do that. In my office, if I walk into the hallway, a sensor will detect my movement and automatically turn on all the lights in the hall. If I walk into the washroom or kitchenette, I get the same thing, except all the lights were off. I no longer have to remember to turn the light off when I leave a room, and I'm almost at the point where I've overcome the instinct to think about turning the lights on when I enter them. Meanwhile, the building owners save money on electricity.

Those are the ones that I notice most, but laptops and tablet computers also have their Star Trek equivalents. Skype allows video conversations, and YouTube and the internet let people record their own daily log, blog, and vlog. (Qaplog!)

And while it's not quite the same as a replicator, when I walk into Bridgehead, the servers know that what I want is a Tea, Earl Grey, Hot.

- RG>

Sunday, April 17, 2011

Why do I even bother not stealing movies?

It turns out my issues with the fucks who decigned Dexter DVDs were grander than I thought.

Microsoft's insidious collaboration with the movie industry has finally hit me. I've kept Microsoft from installing WGA on my computer (I don't need a tool to know that I purchased this copy of Windows XP fair and square, or to keep me from using it once Microsoft's servers stop responding to WGA's requests), and I've stuck with Windows XP because of the DRM inherent to the more recent versions of Windows.

I just rented two DVDs from the video store--you know, instead of simply pirating them which would actually be easier and cheaper--and neither of them would play in Windows Media Player. They wouldn't open in the other program on my laptop, and they crashed my old laptop when I tried any of the three DVD players installed on it.

After over an hour of troubleshooting, my guests and I instead watched TV shows online.

This morning, I called Dell and asked them for help. The guy I spoke with essentially said, "oh yeah, some rental DVDs don't play on computers due to rights somethingorother" (he didn't say "somethingorother" exactly, but he sure didn't know it by name). At least I didn't have to go through dozens of prompts or wait on hold for hours to get this response.

He said the solution is simple: "when I get that problem, I just pop the DVD in to the DVD player and watch it on the TV." Well fuck you. I don't have a DVD player or a TV, and I'm not about to buy one knowing that the industries behind them are out to prevent me from paying for and watching their content.

Of course, the irony is that I specifically rented the videos out of some latent guilt about downloading (thanks to all sorts of fearmongering and propaganda from the movie industry), yet the movie industry itself is behind the restrictions that prevent me from watching these legally-obtained borrowed copies of the films. Not that this is news to anyone, especially me: anyone who follows slashdot has heard all the latest tricks of the Motion Picture Association of America (MPAA) and Recording Industry Association of America (RIAA), collectively and pejoratively referred to as the MAFIAA.

After my failed tech support call to Dell, I did a quick Google search, which returned VLC Player a free, open-source, cross-platform video player that is a project on SourceForge.net, a sister-company to Slashdot that hosts open-source development.

VLC player is able to play my DVDs flawlessly. I wish I'd found it last night when my friends were still here!

Anyway, I've learned my lesson about paying for copyrighted content. I'm going to go download some Bittorrent software and start getting my movies from the pirates, who are more trustworthy than the film industry.

PS: The Conservative party wants to facilitate this process of screwing media consumers and make the punishments stronger--their failed bills would have given Canada one of the most restrictive copyright regimes in the developed world. They scare you by saying the Liberal party will institute an "iPod tax", which is essentially what we already have, and which makes filesharing quasi-legal in Canada. If the Pirate Party has a candidate in your riding in the current federal election, go listen to what they have to say about copyright restrictions. They're not a joke party like the NeoRhino party, they're a serious one-issue party like the Marijuana party.

- RG>

Saturday, February 26, 2011

RealGrouchy upgrades again

(Yes, the timestamp is accurate. I've been somewhat awake since I started the previous post at 6am on the 25th) After I finished the previous post, I read it aloud to myself and liked how it flowed. I wanted to podcast it.

The resulting efforts have resulted in the biggest change since in 2006, when I rebranded the blog. (Which is to say that the template is still the same old off-the-shelf one I picked in 2004, and a couple of details here and there were tweaked.)

After some digging around discovered I'd need some hosting space of my own for podcasts, and of course a domain. With RealGrouchy.com being taken by some squatter in Virginia, I registered RealGrouchy.ca. I used hostpapa.ca which I've had experience with and I know their services are versatile. That said, I just looked at configuring it so that Blogger publishes on RealGrouchy.ca and it looks too complicated, so I just set it to redirect to the ol' Blogger blog.

I also set up a RealGrouchy WordPress account, to make it easier to subscribe by e-mail to comments on people's WordPress-based blogs. It used to be that you just click the checkbox. Then you had to click a link in a confirmation e-mail (missing out on any comments that were posted before you next checked your inbox). Now, and for the last few months, it has required you to follow a link in an e-mail, then click a confirmation button on the other side of that link.

I also set up a GRAvatar (globally-recognizable avatar, IIRC) with my usual RealGrouchy icon (though it wanted me to crop the photo down, chopping off the top and bottom; it wouldn't let me expand the box, so that took more time, making the avatar square in GIMP). Creepily, WordPress automatically associated all my old comments with my new WordPress account and added in my new GRAvatar and blog link.

That's better than LiveJournal, I guess. A couple years ago, I went to register the RealGrouchy handle on LiveJournal to comment on the OC Transpo livejournal, only to find that http://realgrouchy.livejournal.com was publishing a carbon copy of my blog, without my permission, using what they call a "syndicated account". They promptly deleted this copied blog, but told me that syndicated accounts can't be converted to regular personal accounts. Instead, they can delete the account, I can create a new one under a different username, then get them to move the RealGrouchy username for a $30 fee. How nice of them to charge me $30 for stealing my content. I declined, and it's probably just as well that I don't waste time trying to talk sense in the OC Transpo LiveJournal forum.

As for the podcasts, I didn't really have time today to prepare a podcast, much less preparing a podcast and setting up all this hosting stuff.

But the next time I feel the urge to podcast, I'm already a third of the way there (step 1: get web space, step 2: figure out how to podcast, step 3: record and edit the actual podcast for posting).

- RG>

Wednesday, January 05, 2011

Another swap box at Elgin Bridgehead, another repair by RG

[Edit: added photo of hook to close swap box at end.]

Heading out from Bridgehead last night, I was thrilled to find a new one of el maks' trademark Swap Boxes on the post which formerly held this box, which helped save a life. Here 'tis:

Unfortunately, on opening it, I found it to be very empty. There was about $0.13 in change, and a gambling chip I had just put in (I always have a trinket with me In Case Of Swap Box*). While the box was large, it was shallow, making it hard for anything to stay inside. I took this photo with a ruler so I could fashion something of the right size help hold things in. I was thinking along the lines of a panel of clear plastic packaging stapled across the front.

(*title for your next book, Maks?)

Getting home, I looked at my inventory of paraphernalia and found a Ferrero Rocher box my dad gave me at Christmas (a tradition. I was very disappointed the year he gave me Toblerone instead of Ferrero Rocher for Christmas, though I would have accepted Toblerone and Ferrero Rocher). The box was exactly the right width, it just needed to be opened on one end. Here it is trimmed, taped on the sharp cut edge, with some of the cutting tools I employed to try to cut it to the right size. (The laziest, easiest way I found was scoring it with a knife and/or glass-cutting tool, then clipping it with wire clippers carefully. It will not be a clean cut on the discard side).

I had also pre-drilled some holes in the plastic for small screws to hold it in, making sure not to put the holes too close to the edge, lest my hand and the mini-screwdriver not fit in the gap. I then installed it in situ tonight, first marking the holes, then pre-screwing the screws to make the holes, undoing them, then putting them back in with the plastic piece in place. Worked like a charm (and I only measured once!). El Maks approves! See comments.

Then I populated the box with some new stuff I had brought, "swapping" out the gambling chip I had put in the night before (it had been so long since I'd seen a swap box, I had gotten used to this thing in my pocket) and most of the useless goddamn pennies. The extra benefit of this Ferrero Rocher box is that there is a bevelled edge, making it easier to pull things out of the box.

Unfortunately, maks painted the wooden box over its smooth finish, and the paint is chipping off in the cold. Nothing we can do about that.

Also, because of the way the box is attached to the post, the door doesn't close very well.

I fashioned a simple hook out of a piece of wire just now and will install it next time I'm down there, so that the box's contents will be protected from the elements. [Edit: done. See below.]

I'm grateful to Maks for making (and installing?) the box. It's been so long since we've had one in Centretown since he moved to Montreal. It's up to us to make sure it's well used and well kept!

- RG>